Although other browsers like Firefox can also help a user by letting them manage their browser cache size from an interface, Google Chrome does not let the user do it. But this does not mean that it is not possible. In this article, we will be learning how to override the automatic management of cache size in Google Chrome by setting our manual limit.
Change Chrome Cache size on Windows 11/10
There is only one method that can be used to set and limit Google Chrome’s cache size. To do that, first of all, start by launching Google Chrome.
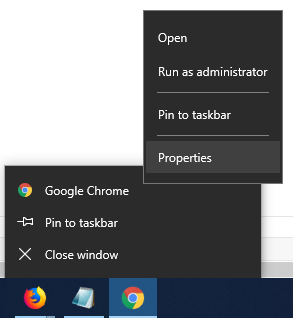
Right-click on the icon for Google Chrome on the taskbar and again right-click on the entry labeled as Google Chrome. Now click on Properties. It will open the Google Chrome Properties window.
Navigate to the tab labeled as Shortcut. In the field called Target, type in the following after the whole address, For example, you can enter it as –disk-cache-size=2147483648 So it should look like this:
Here, 2147483648 is the size of the cache in bytes which is equal to 2 Gigabytes. Click on Apply and then click on OK for the limit to be set. Voila! You are done!