This tutorial will show you how to roll back Windows 11 to Windows 10, provided you perform an in-place upgrade from Windows 10 to Windows 11 – and provided you carry out the rollback operation, within 30 days of upgrading to Windows 11. We also show you how to roll back Windows 10 to Windows 8.1 or Windows 7.
Go back from Windows 11 to Windows 10
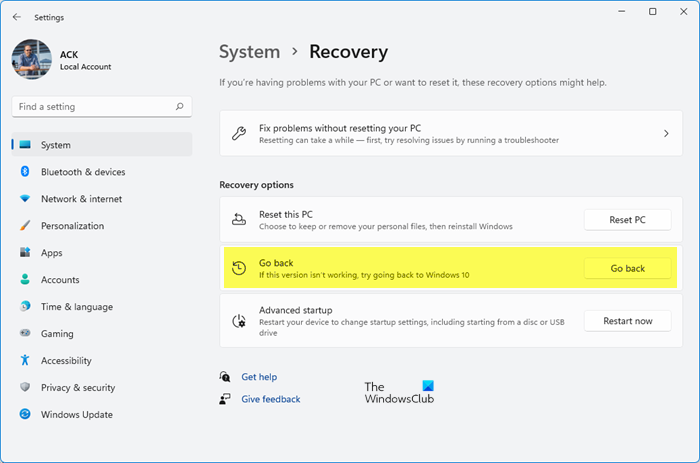
Roll back is now referred to as Go back in Windows 11. Here’s how you can Go back from Windows 11 to Windows 10: Follow the on-screen instructions and all should be good!
How to downgrade from Windows 11 to Windows 10 after 10 days?
If you have crossed the 10-days mark of installation, the Go back button is no longer available for you in the Windows Settings panel. In that case, you must install Windows 10 fresh. For that, follow the following guides one after one to get the job done:
First, you need to download Windows ISO from Microsoft.com.Use the Rufus tool to create a bootable USB of Windows 10.Follow this guide to clean install Windows 10 from USB.
Once you complete the final step as mentioned above, you will be able to set up your Windows 10 computer. However, this process deletes all the files and folders from your computer. Therefore, you may want to create a backup of your important files before following those steps. If the Windows.old folder still exists on your device then you can roll back Windows 11/10 after 10 days limit by editing the Registry or using this PowerShell command.
Rollback from Windows 10 to Windows 8.1 or Windows 7
Microsoft has kept an option of rollback, where unsatisfied users can uninstall the upgrade and rollback to the previous version of Windows – Windows 8.1 or Windows 7. To roll back your Windows 10, go to your PC Settings, by typing Settings in the taskbar search bar, next to the Windows icon, and clicking on Settings. It will open the PC Settings. Select ‘Update and Security’.
The Update and Security option opens. Here you will see options like Windows Update, Activation, Backup, Recovery and Windows Defender. Click on ‘Recovery‘. This will open the Recovery settings window for your PC. You will see 3 options:
Click on ‘Go back to previous version of Windows’. In this case, you see Go back to Windows 8.1. Microsoft will then ask for your feedback and the reason to uninstall Windows 10.
Give your feedback and move ahead. Click on Next. You will see the following screen.
Make sure your PC is plugged in as the rollback might get interrupted due to power off. Click the Go back to Windows 8.1 button. Your system might take a while to process the rollback and read the settings of your previous Windows version. Sit back and enjoy a cup of coffee. Note the important warning – you need to know or remember the password you used to sign in to your previous Windows version. Once the rollback process is completed, your PC will automatically be booted into your previous version of Windows. You can also get back to an earlier build of Windows using this method. Rollback is dependent on the availability of the Windows.old & other folders folder, if you delete that, then you may not be offered the option to rollback. See this if you receive We’re sorry, but you can’t go back. The files we need to take you back were removed message. But if you follow this trick, you may be able to roll back Windows after 30 days limit. On one of my other laptops, I upgraded my existing version of Windows 8.1 and ended up with a bit of a mess. So I decided to go in for a clean install of Windows on a separate partition using a bootable USB. You can also downgrade from Windows using EaseUS System GoBack or Windows 10 Rollback Utility. Bonus Tip: Learn how to extend the time period to uninstall a Windows Upgrade.