Activity History in Windows 11/10
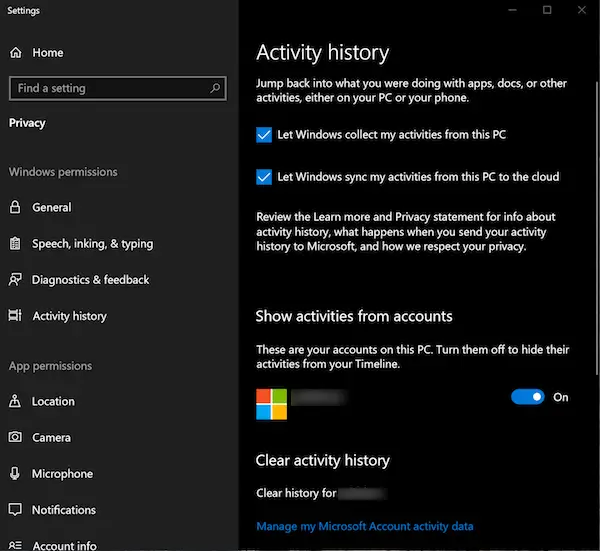
Keeping Windows Privacy in mind, Microsoft offers you to manage your activity history, and restrict Windows to keep track. Just before we start, there are a few things you should know about Timeline and Activity History:
It collects activities from the PC you are using.It can sync your activities from this PC to the cloud.You can access this history when you switch PC
All these are linked with the Microsoft Account you sign in to the PCs. To manage everything, go to Settings > Privacy > Activity History.
How to remove your account from Activity History
Under Activity History, look for the section which lists all the accounts available on that PC. There is a toggle button, choose to turn it off. Windows 10 will not track any activity and create a timeline for that account.
Prevent Windows 11 from sharing Activity History data
Press Win+I in combination to open Windows Settings. From the side panel on the left, select Privacy & security heading. Move to the right-side and locate the Activity History tile. When found, click it to expand its menu of options. In the new page that opens, scroll down to the Clear Activity History section and hit the clear button below the desired account.
Next, uncheck the Store my activity history on this devices box under the Activity History privacy page.
Similarly, go back to Privacy & security page, choose Diagnostics & feedback tile and under the page settings, slide the toggle next to the Send optional diagnostic data heading to the off position.
Prevent Windows 10 from sharing Activity History data
To prevent Windows 10 v1809 from sharing Activity History data, you need to do the following:
Open Settings > Privacy > Activity history > Uncheck ‘Send my activity history’.Open Settings > Privacy > Diagnostics & feedback > Set ‘Diagnostic data’ to Basic.
Read: How to disable Windows 10 Active History permanently using REGEDIT or GPEDIT.
How to clear Activity History from Windows 11 PC
Under section Clear Activity History, you can choose to clear history for your account. To manage & clear all your history, click on the link which says Manage my Microsoft Account activity data.
This will take you to the Microsoft Privacy website which may ask you to sign-in. Once you are into your account, switch to activity history page. Clear your history.
How to clear Activity History from Windows 10 PC
Under section Clear Activity History, you can choose to clear history for your account. To manage & clear all your history, click on the link which says “Manage my Microsoft Account activity data”. This will take you to the Microsoft Privacy website which may ask you to sign-in. Once you are into your account, switch to activity history page.
Here you can see the collected data based on Apps, and Services, Voice, Search, Browse, Media, and locations. That said, you can always go to Microsoft’s Privacy Settings for your account, and directly do it from there even when you are not on your PC. The Privacy Section of your Microsoft Account can be accessed by following this link.
Microsoft has clearly said here that the info that appears on that page represents the most relevant personal data that they save with your MS account to help make your experience with products, and services better. So if you use Timeline, and have multiple PCs it actually delivers a great experience. Since this page is related to you, the data is visible only to you, and you can clear it anytime you want by selecting a data type from the filters available on the page. The Privacy Dashboard also offers you to download your data, access Cortana’s notebook, change ad settings, and so on.
Where is Activity History?
Activity History in Windows 11 can be found under Privacy & security settings section. It keeps a track of the things you do on your devices, such as the apps and services you use, the files you open, and the websites you browse and store it locally on your device.
How do I open Optional diagnostic data?
To open optional diagnostic data in Windows 11, go to Settings > Privacy & security > Diagnostics and feedback. Here, you can delete diagnostic data for your device. Note that selecting this option does not delete the diagnostic data that is associated with your Microsoft account, nor does it stop your diagnostic data from being sent to Microsoft.

