Rename Physical Drive in Storage Pool for Storage Spaces
We can rename Physical Drive in Storage Pool for Storage Spaces in Windows 10 in 2 quick and easy ways. We’ll explore this topic under the methods outlined below in this section:
1] Via Settings app
To rename Physical Drive in Storage Pool for Storage Spaces via Settings app in Windows 10, do the following:
Press the Windows key + I to open Settings.Tap or click System.Click/tap on Storage on the left pane.Next, scroll down and click/tap on the Manage Storage Spaces link on the right pane.
OR
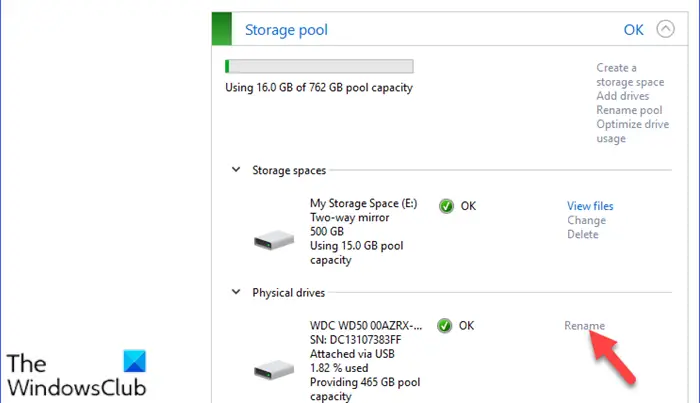
Press Windows key + R to invoke the Run dialog.In the Run dialog box, type control and hit Enter to open Control Panel.From the top right corner of the window, set the View by option to Large icons or Small icons.Click Storage Spaces.Click the Change settings button, click on Yes if prompted by UAC.Click on the Rename link for the physical drive you want to change the name of in the storage pool you want.Now, type a new name you want for the physical drive.Click on Rename drive button.Exit Control Panel when done.
2] Rename Physical Drive in Storage Pool for Storage Spaces via PowerShell
To rename Physical Drive in Storage Pool for Storage Spaces via PowerShell in Windows 10, do the following:
Press Windows key + X to open Power User Menu.Tap A on the keyboard to launch PowerShell in admin/elevated mode.In the PowerShell console, type in the command below and hit Enter:
Make note of the current friendly name of the physical drive (Physical drives in storage pools will be the ones listed as unspecified “media type”) you want to rename.Now, type the command below into the elevated PowerShell window and hit Enter. Substitute the
Exit PowerShell when done.
That’s it. Now read: How to Add Drives to Storage Pool for Storage Spaces in Windows 10.